How to get Windows to recognize a NodeMCU (ESP8266) so you can flash it from Arduino or Cursor
What you will end up with
When you are done:
- Windows shows the NodeMCU in Device Manager (not as Bluetooth).
- Arduino IDE can select the ESP8266 board.
- Cursor / PlatformIO can
uploadto the same COM port.
1. Use a USB cable that carries data
Use a cable that carries data, not charge-only. If the PC does not see any new device when you plug in the board, it is almost always the cable or the USB port.
2. Identify the USB–UART chip and install the driver
On the board, near the USB connector, there is usually a small chip. The driver depends on which one it is:
| Chip on the board | Driver |
|---|---|
| CH340 / CH341 | CH340 driver (very common on NodeMCU clones) |
| CP2102 (Silicon Labs) | USB to UART Bridge VCP |
NodeMCU reference documentation (includes the driver topic):
If the chip is Silicon Labs (CP210x), the official driver is here:
Install the driver, then unplug and plug the board back in.
How to check that Windows saw it
- Open Device Manager.
- Look under Ports (COM & LPT).
- You should see something like USB-SERIAL CH340 (COMx) or Silicon Labs CP210x (COMx).
That COMx is the port you use to flash.
If the driver is missing, the chip does not land under Ports. It shows up under Other devices with a warning, while COM3 and COM4 stay as Standard Serial over Bluetooth — those are not the ESP:
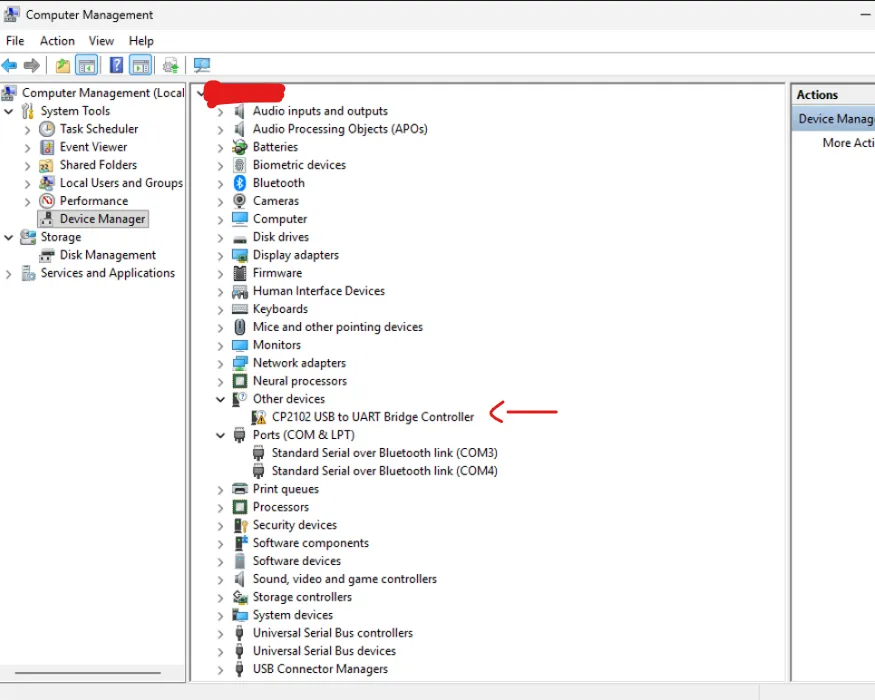
Install the driver, unplug and plug the board back in, then check Ports (COM & LPT) again. If PlatformIO or Arduino only list the Bluetooth COMs, you are still in this state.
3. Install ESP8266 support in Arduino IDE
Even if you later compile with PlatformIO in Cursor, this step leaves the Arduino environment ready (same board family).
- Open Arduino IDE.
- File → Preferences.
- In Additional boards manager URLs, paste:
http://arduino.esp8266.com/stable/package_esp8266com_index.json- Tools → Board → Boards Manager.
- Search for esp8266 and install version 3.1.2.
4. Pick the right board
Under Tools → Board:
- NodeMCU 0.9 (ESP-12 Module)
That is the one I used. If your board is a newer NodeMCU (v2/v3, ESP-12E), NodeMCU 1.0 (ESP-12E Module) often works better. If the upload fails with 0.9, try 1.0; pins D1, D2, and so on still use the same board names.
Also select the COM port from step 2 (the CH340 or CP210x, not Bluetooth).
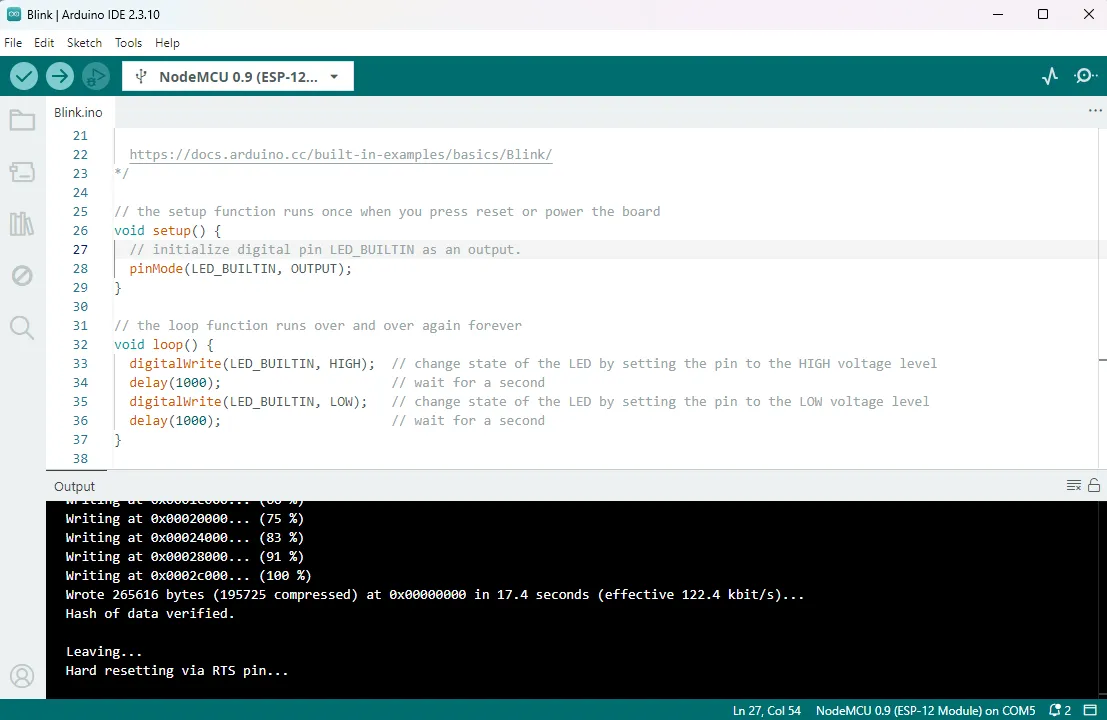
When the board and COM are right, a Blink upload in Arduino looks like this — NodeMCU 0.9 on COM5, hash verified, then a reset:
5. In Cursor (PlatformIO)
Cursor does not replace the driver. It still needs the same COM port.
In this project, upload from the firmware folder with:
py -m platformio run -e nodemcuv2 -t upload -t monitorIf python -m platformio fails, use py -m platformio (the Windows launcher). PlatformIO does not have to live inside the API venv.
When the port is correct, the serial monitor shows the ESP log. If it does not list the board, go back to Device Manager: it is almost never “Cursor”; it is the driver, the cable, or a Bluetooth COM port.